Raspberry Pi – Button as a digital toggle switch

Ability to directly control the GPIO (general purpose input output) pins is one of the reasons the miniature Raspberry Pi is so famous with hobbyist and educationalists.

In this self learning exercise, I will read the status of the button, determine if it is pressed or not and then based on that, switch the LED on or off.

Very basic right? Let’s follow along.

Components

  1. Raspberri Pi 2 Model B (40 pin) with Raspbian OS
  2. Breadboard
  3. Connectors
  4. LED 5mm
  5. Push Button
  6. Resistors – R1 (330 ohm) & R2 (1K ohm)
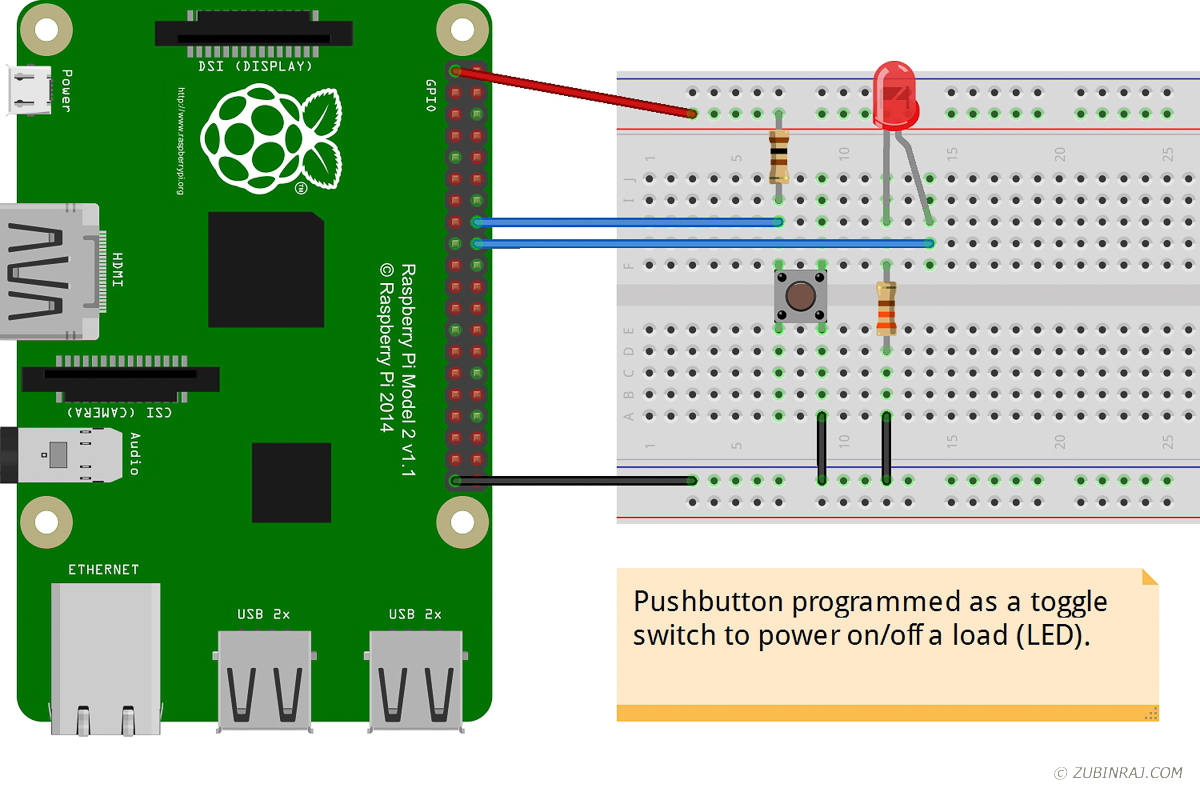
Wiring It Up

My setup uses the GPIO 23 (pin #16) and GPIO 24 (pin #18), however you can use any GPIO pins for this purpose. If you are using different pins, make sure to update the pin numbers in the program below.

  • GPIO 23 (pin #16) –  Used as input to read the status of button
  • GPIO 24 (pin #18) – Used as output for switching the LED on and off
  • +3.3V (pin #1) – Connected to power rail on the breadboard
  • GND (pin #9) – Connected to ground rail on the breadboard
  • R1 – Connected between LED and ground
  • R2 – Connected between 3.3V power rail and button
20150820-RPI_Push_Button_Toggle_Switch_bb
Push button programmed as a toggle switch to power on/off a load (LED)

Program

You need a program to tie these hardware together; to read the status of the button and send the signals to light up the LED.

I used ‘C’ with WiringPi libraries. I’m quite new to these myself. If you prefer, you can also do the same with Python. Geany is my favorite editor on the Raspberry Pi, works for both C and Python.

Let me quickly explain the functions of WiringPi library used in the program:

digitalWrite() – used to send an output to the GPIO pin. The first parameter is the pin number. Second parameter determines if the pin should be set as either HIGH or LOW (it can take only 2 states).

digitalRead() – used to read the status of the GPIO pin. The only parameter passed is the pin number. The output is either HIGH or LOW and can be checked as below:

Once this part is understood, whipping up a code to capture the pressed state of the button and lighting up an LED is  a piece of cake. Not joking, it really is!

The next part is how to toggle. This is done by remembering the previous state of the button and when it changes, determine whether to switch the LED on or off.

Since the program involves low level access to gpio pins, it will need ‘sudo’ permissions to run this program.

Summary

Here, we saw how to read input from a button and write output to light up an LED using the GPIO pins of a Raspberry Pi. Once we have these basics right, then the same knowledge can be used to drive other loads like a relay, motor etc.

References

WiringPi – GPIO interface library for the Raspberry Pi

WiringPi GPIO Pins – Pin layout for WiringPi specific and Broadcom specific pin modes

Adafruit – Tons of stuff related with Raspberry Pi and Arduino


Installing Windows 10 on Raspberry Pi

Raspberry PiRaspberry_Pi, is a wonderful tiny credit card sized computer created by people who were passionate about education. It is a little device that enables people of all ages to explore computing and to learn how to program in languages like Python and Scratch. Due to its small size and relatively low power consumption, it is also widely used by IOT (Internet of Things) enthusiasts.

The Raspberry Pi landscape has been dominated so far by Linux based operating systems like Raspbian, OpenELEC and the very recent Snappy Ubuntu.

With Microsoft rolling out a version of Windows to this platform, it provides an opportunity for many more people to be engaged with the magic of Raspberry Pi.

Step by Step

  • Download the Windows 10 IOT image for Raspberry Pi from here (around 500 MB).
  • Extract Windows_10_IoT_Core_RPi2.msi, from the ISO image that was downloaded in the previous step. I used the popular 7-zip to extract.
  • Install Windows_10_IoT_Core_RPi2.msi on your computer. I used a Windows 7 computer for this.
  • Run ‘Windows IOT Core Image Helper’ from start menu.

Windows_IOT_Core_Image_Helper

  • Select the correct SD card from the list.
  • Select the .ffu image file which is installed in the folder: ‘C:\Program Files (x86)\Microsoft IoT\FFU\RaspberryPi2’.
  • Click on ‘Flash’ button.
  • The ‘Deployment Image Servicing and Management Tool’ will run which will transfer the ffu image file to the SD card.

dism

  • This process takes some time, so please be patient until the status at the bottom shows as below.

Windows_IOT_Core_Image_Helper_Complete

  • I checked how the partitions are divided on the SD card using the Mini Partition Tool, here’s a screenshot.

Windows10_IOT_Partitions

  •  After it is successfully installed, pop the SD card into the Raspberry Pi and power up. I used the Raspberry Pi 2 Model B, the one with the 1GB RAM on it.
  • Again, the process takes some time, so please be patient.
  • Unfortunately, there is no Wifi support (yet), so I plugged mine over an ethernet cable to the router.
  • As I connected it as headless (without connected to a monitor), I watched my router to find out the IP address after it boots up.
  • The default hostname of the new Windows 10 IOT device is ‘minwinpc’
  • Now connect over SSH (you can also use powershell) using the default credentials (username: Administrator, password: p@ssw0rd)

Windows_IOT_SSH_Login

  • After logging in over SSH a familiar DOS like interface is displayed with the familiar C:\> prompt.
  • Below screenshot shows the default shares setup on the device.

Windows_IOT_Default_Shares


Congratulations! Windows 10 IOT has been successfully setup on your Raspberry Pi!


References:

  1. https://dev.windows.com/en-us/iot
  2. http://ms-iot.github.io/content/en-US/win10/SetupRPI.htm
  3. https://github.com/ms-iot/samples
  4. https://www.raspberrypi.org/


Windows 10: First Drive

Last day I got a chance to install the latest of the Windows breed from the Microsoft stable. The Windows 10 Technical Preview. You can download the install files from here.

This is a touted as the successor of Windows 8, which did not make any impact in the market. Windows 8 was primarily intended for touch screens. The desktop integration was an afterthought. However for Windows 10, there is a clever attempt to marry the desktop with the modern touch friendly interface.

Installation

I dual booted the Windows 10 with the existing Windows 7 on my laptop.  The installation was uneventful. It detected all the hardware correctly. NVIDIA drivers were installed separately.

First Look

Having used Windows 8 before, there were not much surprises. The desktop integration is a welcome addition. The choice of viewing an application in full screen now rests with the users (In Windows 8, all applications open in full screen mode). Users can cycle between full screen, windowed or minimized mode.

The Start menu now has a small button at the top right to make it either full screen (ideal for tablets) or in normal mode (ideal for desktops). The good part is that live tiles are enabled on the start menu in both modes.

win10_start_screen
Windows 10 – Start menu in full screen mode
win10_task_manager_disk_usage
Windows 10 – Task manager has a new look and more details
win10_task_manager_minimal
Windows 10 – Task manager now has a minimized view with just the critical information

Application Compatibility

Applications designed for the ARM architecture and applications developed for the x86 architecture worked side by side. There is no switching required between the modern UI and desktop UI anymore like in Windows 8.

I tried installing some of the legacy windows applications and all of them worked seamlessly. However, the applications I compiled for the Windows 8 machine failed to run. I don’t know the reason at this time, I’m investigating.

Universal Windows Apps

Universal Windows Apps is a great idea, the support of which started with Windows 8.1. It promises to provide the developers with a common windows platform which gives a consistent API with consistent UX design. The developers can have the same code base for multiple platforms like desktops, tablets & phones. As a developer, I love this! 🙂

Further Reading

1. A video by Windows VP Joe Belfiore explaining the features of Windows 10:

2. Read about all the new features:

http://windows.microsoft.com/en-us/windows-10/about

3. Download your copy of the Windows 10 Technical Preview:

http://windows.microsoft.com/en-in/windows/preview-iso

Implementing Isotope with Knockout JS

Knockout is a javascript MVVM (model view view-model) library which provides an excellent data binding mechanism at the client side. Isotope is an amazing javascript layout library.

I have used Isotope library in php pages before and it was a breeze. So naturally I thought it was a cake walk to implement Isotope anywhere. However, when I tried implementing it inside the Knockout framework, that was clearly not the case and I had some good learning on the way.

The problem

Both Isotope and Knockout works by manipulating the DOM. Knockout dynamically converts the binding definitions to DOM elements when data binding is executed. Isotope adds css classes to each DOM element so that it can find those elements later and manipulate them.

However, when Isotope runs, Knockout has not yet created the elements for proper initialization. Isotope doesn’t re-evaluate the elements and hence doesn’t know about the elements it needs to manipulate. After looking for quite a while for a solution, this jsfiddle and this post came to the rescue.

Custom bindings to the rescue

In Knockout, you can create your own custom bindings apart from the standard bindings defined in the Knockout library. There are 2 hooks defined for each binding – ‘init’ and ‘update’.

Let’s see an example:

Here, the ‘init’ hook is called when the binding is first applied to an element. The ‘update’ hook will be called when the binding is first applied to an element and again whenever the associated observable changes value.

For this custom binding to be called, it needs to be declared in the html or the view from where the binding takes place.

Here, the name of the binding is ‘customBinding’.

So, using this custom binding, the isotope can be initialized for each item in the binding list as it is added to the view.

Then, inside the view, invoke the custom binding:

Here, ‘isotope’ is the name of the custom binding. Parameters ‘container’ and ‘itemSelector’ are passed to the custom binding for initializing the isotope. Since it’s applied inside the ‘foreach’ loop, this will be called each time an item is inserted or removed.

Voila! Now immediately after Knockout adds each item dynamically, the custom binding will add the attributes required by Isotope to each element, thereby allowing Isotope to manipulate and resize the elements later.

DEMO

Masonry & Isotope – Amazing Javascript Layout Libraries

What is Masonry?

Masonry is a cascading grid layout library written in Javascript. It works by placing elements in optimal position based on available vertical space, sort of like a mason fitting stones in a wall. If you have seen Tumblr, you already know what I’m talking about. Masonry was written by David DeSandro, who is a web designer at Twitter.

What is Isotope?

This another javascript layout library by the same David DeSandro who wrote Masonry. Isotope adds sorting and filtering of UI elements. It uses Masonry layouts in addition to other layouts.

I found both of them to be so amazing, I whipped up a few demos to see for myself!

Demo: Masonry with jQuery

In this demo, masonry layout is used.  Go ahead and resize the browser window to see the elements in the window automatically changing the layout to fit the screen. Usage of this appropriately will make the design fluid and gracefully fit on screens of varying sizes, as is common these days.

Demo: Isotope with jQuery

In this demo, isotope is used with masonry layout. You can see client side filtering in action here. Go ahead and click on the various categories displayed on top. Notice when you resize the window here, it behaves different from the masonry demo above. This demo uses a fixed column masonry layout, meaning, the number of columns will remain the same, but each element gets resized to fit the screen.

Reference:
Masonry: Home | Github
Isotope: Home | Github

Implementing Singleton Pattern in Javascript

In singleton pattern, one instance of a class will be instantiated and no more. The same object is returned to all the clients that request for a new object of a singleton class. In traditional object oriented languages, this is achieved by making the constructor private and exposing a static public property which in turn returns the same instance every time.

Let’s see how this is done in javascript:

The public method getInstance() exposes the object instance. A check is done to see if an instance was created earlier. If it was created before, that same instance is used; otherwise a new instance is created and returned.

The init() function exposes the public and private methods of the instance. Private methods and properties are protected from outside access. Public methods and properties are accessible from outside, just like any other modules.

The singleton pattern is not very useful in the context of javascript in traditional webpages, as the application scope gets reset every time the page is refreshed.

However, the singleton implementations come particularly handy in Singe Page Applications commonly referred as SPA. In a SPA, the entire lifetime of the application is managed in a single page and there are no page refreshes that reset the application life cycle.

Module Pattern In Javascript

Module pattern allows to emulate the concept of classes in Javascript. It allows to create private methods and variables along with their public counterparts inside the same class, thus shielding particular parts of the class from the global scope.

Let’s look at an example:

Here, the private variable ‘random’ is encapsulated and any code outside of the module can’t access this variable. The functions and properties inside the ‘return{ }’ are exposed publicly and anything outside of ‘return{ }’ are considered private.

This is can also be written as a self-contained module:

Notice the () at the end of the module definition? This will create an instance and return it in the global variable ‘module’.

Passing arguments

A variation of this pattern allows to import modules and alias them locally by passing it as arguments to the anonymous function.

Let’s look at another example:

Here, the global variable jQuery is passed as ‘jq’ into the module making it local inside the scope of the module.

Reference:
From the excellent online book by Addy Osmani:
Learning Javascript Design Patterns

Change Table Prefix For Self Hosted WordPress

The default wonderful 5-minute installation of wordpress keeps the prefix of “wp_” for all its tables. Now why does anybody wants to change the default prefix?

There are 2 reasons I can think of:

  1. The first and foremost is security. Since the default table prefix is world renowned, changing it will put a first level of defense against any vulnerability or a malicious user trying to execute a rogue code.
  2. Each wordpress installation takes in a configuration to tell it which prefix it uses. By keeping the prefix different from each installation, you can host multiple wordpress installations in a single mySQL database (not recommended from large installations).

Here’s the configuration in the wp-config.php that determines what prefix wordpress uses.

There are wordpress plugins that can change the table prefix automatically, however, I prefer the manual approach so that I understand the changes that are being made.

I’m putting down the steps that I did more for my own reference in the future.

1. Take a backup

Since you will be changing the table structure, backup the database. Next, take backup of the wordpress home folder. Keep both the database backup and home folder backup together in another folder. You will need these for performing a full restore later, in case something goes wrong.

2. Change the configuration in the wp-config.php file

Change this to a prefix to your liking. I would suggest making this as random as choosing the password.


3. Change the wordpress tables names

Login to phpMyAdmin and select the wordpress database. Go to the SQL area and enter the command to rename each table. There are many tables that start with wp_, change one table at a time. Below are the list of tables found in my installation, however make sure all your tables are renamed.

4. Edit wp_options table

Next is to change the values in the options table. This table is called tr1mr1_options after the renaming step above.

Browse the table and look for the value called ‘wp_user_role’ under ‘option_name’ column. Change ‘wp_user_roles’ to ‘tr1mr1_user_roles’.

5. Edit wp_user_meta table

Look every row under ‘meta_key’ column in the table tr1mr1_user_meta table, as it is called after the renaming.

Change all keys that start with ‘wp_’ to ‘tr1mr1_’. This may be different in different installations, so make sure you cover all the rows.

Here are some I found.

6. Test

Done! Now test the installation.

If anything goes wrong, you have a backup to restore and start again. Happy blogging!

The Curious Case Of 64-bit MSI

Over the past couple of years, more and more companies have rolled out the 64-bit version of their respective products, including Office and Oracle. Office has both 32-bit and 64-bit versions of their new Office 2010 platform. Similarly, Oracle has also released the 64-bit version of their client drivers in addition to the already existing 32-bit versions.

For these 64-bit versions to work seamlessly, all the components that they depend on also has to be 64-bit. For example, Office 2010 64-bit version cannot access any add-ins or legacy COM components that are 32-bit. Similarly if there is a database connectivity to be made from Office 2010 64-bit, it requires the 64-bit version of the oracle drivers.

Recently I encountered a situation where I had to convert a 32-bit .net COM component to 64-bit to be accessed from 64-bit Office. The COM component was packaged as an MSI file which will be installed on the user machines. To me, converting this to 64-bit was a no-brainer.

  • Take the setup program used to create the MSI package
  • Change the Target Platform to 64-bit
  • Build the MSI
  • Deploy

And that is exactly what I did, job done in 20 minutes! But to my surprise, the Office 64-bit refused to recognize the installed COM component. What’s going on?

Digging deeper, I found that the component is getting registered in the SYSWOW64 section in the registry instead of the SYSTEM32 section. Now, if you are not familiar with the SYSWOW64, this is where Microsoft decided to put all 32-bit programs on a 64-bit machine (like Win 7) and SYSTEM32 is where all the 64-bit programs will reside (I know the naming is just confusing!).

I went on to reason that if the component is getting registered in the SYSWOW64, then somehow the installation process should be running as a 32-bit process. But I did change the Target Platform to 64-bit, didn’t I? I did!

target_platform_64bit

Browsing through a number of MSDN blogs and knowledge base articles with my new friend, BING, I found a blog post where it was explained that there is a small glitch with the setup program bundled with Visual Studio 2010 and there is an additional step that needs to be done to make the MSI truly 64-bit.

Visual Studio 2010 Setup Program

If the installation program includes custom actions, Visual Studio 2010, when creating the MSI, includes an additional DLL called InstallUtilLib.dll. When this DLL is included, the setup program includes this from the 32-bit area of the .net framework instead of the 64-bit Framework64 folder. When the MSI runs, it detects that there is a dependency that is not supported on 64-bit and runs the entire process as 32-bit.

Currently, nothing can be done directly from Visual Studio to correct this situation. The suggestion is to modify the MSI after it has been created.

Orca to the rescue

Orca is a program that is used to create or modify an MSI installable file. It is bundled along with the .net framework SDK, so if you have Visual Studio, it is likely that you already have it. I searched the term ‘orca’ in my program files and it threw up the Orca.msi, which then I installed.

What are we modifying? We are going to open the MSI that was created by Visual Studio in Orca, replace the InstallUtilLib.dll (32-bit) that was added by default with the 64-bit version of the same DLL.

First open the MSI in Orca.

orca_installutillib - Copy

The left hand side displays all the tables that are present in this MSI. Choose the ‘Binary’ table. On the right hand side, you will see the entry for ‘InstallUtil’.

Double click on the area where it says ‘[Binary Data]’. It will open a ‘Edit Binary Stream’ dialog as shown below. Make sure the ‘Read binary from filename’ option is selected.

orca_edit_binary_stream

Click on Browse.

Browse to %WINDIR%Microsoft.NETFramework64v2.0.50727

Select ‘InstallUtilLib.dll’.

Click on OK button.

Notice that the folder name says ‘Framework64’ (with a suffix ‘64’). The Framework folder (without the suffix ‘64’) is its 32-bit counterpart.

Save the MSI file.

Voila! With the 32-bit dependency removed from the MSI, the MSI now runs as a 64-bit process, registering the COM in the SYSTEM32 section and correctly so.

Problem solved!

Setting Up A Git Repository

All the version control systems I have worked with so far like CVS, VSS and Team Foundation Server are centralized version control systems. Git, however, is a distributed version control system. Clients don’t just checkout the latest snapshot from the server, but they mirror the entire repository.

So, when I decided to setup my own version control system for personal use, I decided to give Git a try.

Git can be installed on any computer and you have a version control system right away. However, I also wanted a remote repository on my main file server (maybe bias from working with centralized version control systems for many years!)

To achieve this, Git has to be installed on the main file server (remote repository) as well as on the local computer (local repository). The good part about this setup is that the local computer does not require to be connected to the server all the time (which is usually the case with centralized version control systems). It needs to be connected only when the changes has to be pushed back to the main server (remote repository). This is different from other centralized version control systems where the clients has to be connected to do any operation like compare previous versions / branch / check-in / check-out etc.

Installing Git on the remote server

Let’s first install Git on the remote server. I use a Synology disk station that runs BusyBee Linux as my main file server.

Instead of ipkg, use whatever package manager is available on your distribution. If you are using Synology and do not have ipkg package manager, you can install ipkg by following my earlier post Bootstrapping Synology DiskStation – Unleash The Power.

Initiate a bare repository on the remote server

Now that Git is installed, initiate a bare repository. There are 2 types of repositories in Git – bare and working. Bare repository is one without a working directory. For the remote, initiate a bare repository.

Install Git on the local computer

I use a Windows 7 machine as my local. Installed the Git core for Windows from msysgit. You can also find the download for Windows from here.

This installs the core, a bash and a minimal GUI.

image

Even though this is enough for most of the Git operations, I prefer to use the Git Extensions locally. Git Extensions has windows explorer integration and also integrates with Visual Studio.

Initiate a new repository from Git Extensions. If you already have a source code folder, you can choose that to create a new repository and convert the existing folder as a working folder. Choose ‘Personal repository’ as we want a working folder on the local.

image

After a few commits and branching and merging, the local repository looks like the below. It gives a good visual interpretation of what’s going on.

image

Connecting the local repository with the remote

Being distributed, one local repository can be linked to one or many remote repositories. In Git Extensions, go to Menu > Remote > Manage remote repositories > New

The recommended method of connecting to a remote is to use a SSH connection with public / private key authentication, without getting prompted for the password.

However, I chose to use another method. My remote is on a file server that I have access to and can be accessed from Windows machines on the local network. I  created a samba share to the remote repository folder, and created a network drive mapping from my windows machine. (P: as shown in the below screenshot, points to the remote repository created above in /volume1/git ). This is not a recommended method if there are many users, but works fine in my case.

image

Push changes to the remote

When the changes are ready to be pushed to the remote, click on the Push button. There is a also Pull button to pull any changes other users might have done.

image

When the changes are pushed to the remote, all the commits, branches, merges and other operations done locally are pushed to the remote repository.

If another user has committed to the remote during the time you were making changes locally, Git will not let you push to the remote directly. You will need to pull the changes from the remote, merge those changes into your own repository, resolve any conflicts and then push the changes to the remote. This built-in mechanism protects one user’s changes to be overwritten by another user accidentally.

GitList – A beautiful web interface for the repositories

I tried a few web interfaces for viewing my remote repositories, but GitList stood out from the rest by it’s minimalistic approach.

It was a pretty easy installation on a PHP / Apache The below installation instructions are from the GitList author.

  • Download GitList from gitlist.org and decompress to your /var/www/gitlistfolder, or anywhere else you want to place GitList.
  • Rename the config.ini-example file to config.ini.
  • Open up the config.iniand configure your installation. You’ll have to provide where your repositories are located and the base GitList URL (in our case, http://localhost/gitlist).
  • Create the cache folder and give read/write permissions to your web server user:

The options in the config.ini are simple at best.

See few screenshots below:

image

image

image


References

An excellent book on all things Git:
http://git-scm.com/book

Git downloads:
http://git-scm.com/downloads

List of GUI clients:
http://git-scm.com/downloads/guis

GitList – web interface:
https://github.com/klaussilveira/gitlist
http://gitlist.org/